Welcome, future engineer! You’re about to bring your very own 8-legged alien explorer to life.
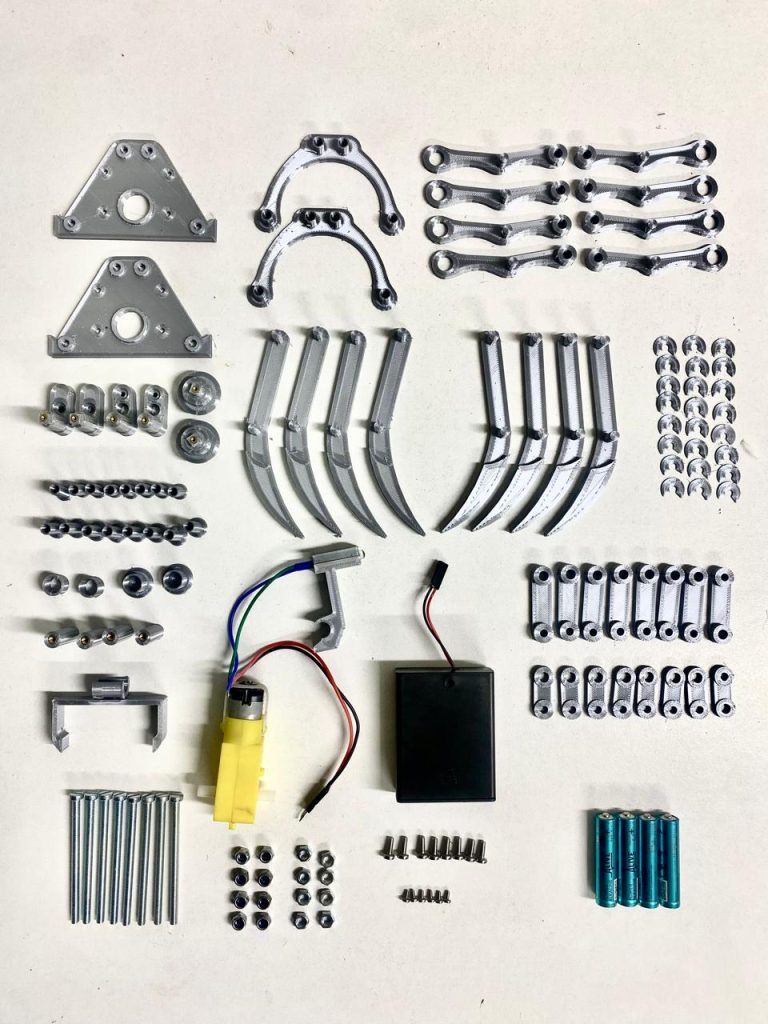
Inside this kit, you’ll find over 130 individual parts. At first glance, it might look like a lot—but don’t worry. Just take it step by step, piece by piece, and before you know it, your robot will be scuttling across the floor.
What you’ll need:
A small Phillips screwdriver
Patience (the good kind—the kind that makes the final result even sweeter!)
A few tips before you start:
Read each step carefully before you begin.
Lay your parts out so you can see everything clearly.
If something doesn’t fit, don’t force it—check that you’re using the right piece (each piece is coded and refered to in the instructions).
Take breaks if you need to. Building should be fun, not frustrating!
Remember: every great engineer started right where you are now. Take your time, enjoy the process, and get ready for that incredible moment when STARWALKER takes its very first step.
LET’S EXPLORE!
PARTS LIST:
X93 Component Body Parts
X1 TT DC Motor (wired)
X1 LED (built into head)
X1 AAA Battery Case (with switch)
X4 AAA High Capacity Alkaline Batteries
X8 M4 Locknuts
X8 M4 Nuts
X8 M4 Screws 60mm (longest)
X8 M3 Screws 6mm
X6 M2 Screws 3mm (smallest)
TOOLS NEEDED: Small Screwdriver
Estimated Build Time: 1 to 2 hours
To avoid frustration for the younger minds break up the build into multiple sessions.
1
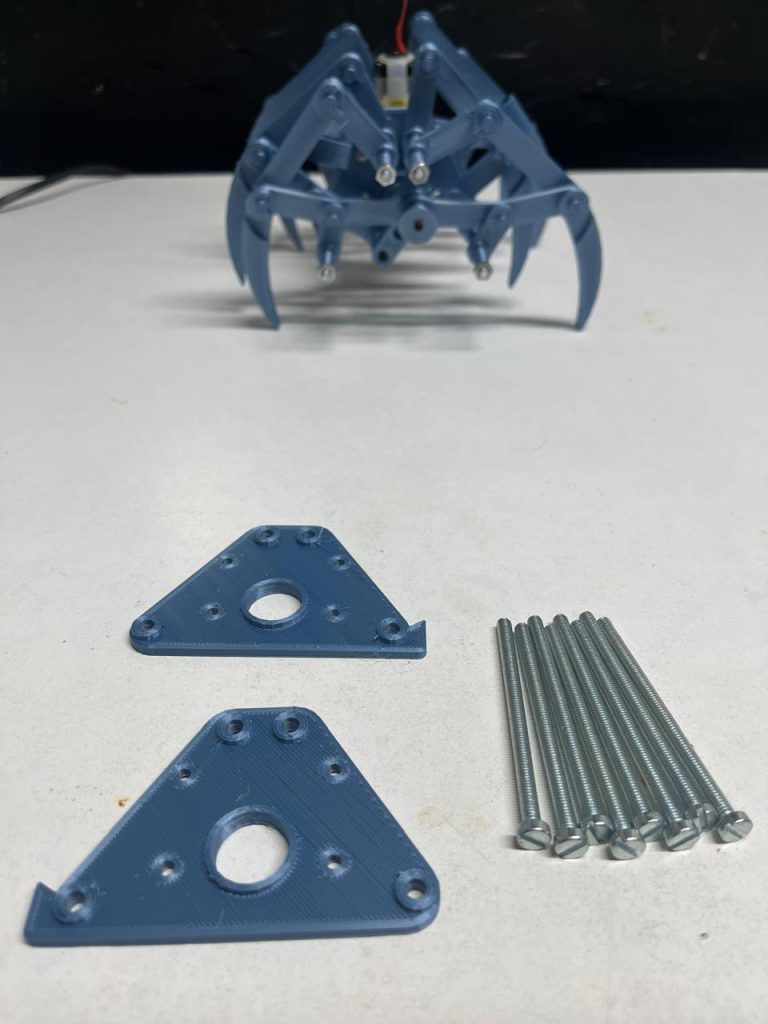
Screws M4 X 60mm (8)
D1 & D1M (Body Panels)
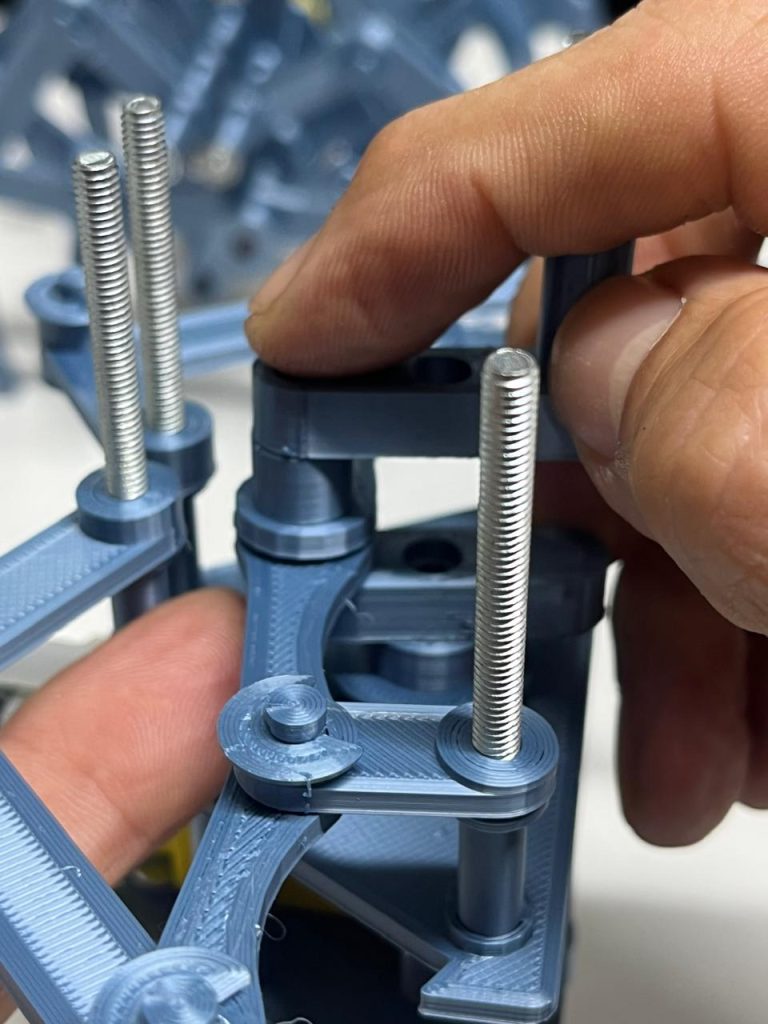
Turn the screws into the outer most holes as shown. Start screwing from the smooth side of the body panel, the side of the panel with ridges must be on the same side as the extended screw. Look closely at the picture.
It is a long screw so will take a while, be patient.
2
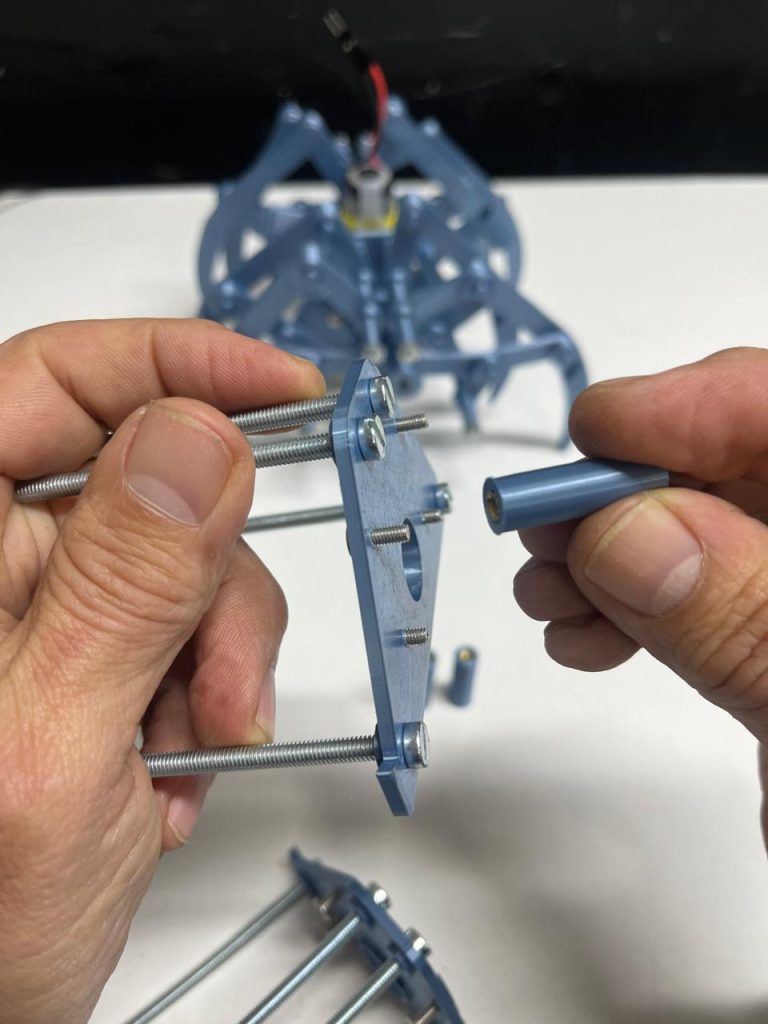
Screws M3 X 6mm (8)
C6 – Body Spacers (2)
Fit screws into the remaining 4 holes in one panel all the way through. In the second panel turn the screws only far enough so they stay in but don’t stick out on the other side.
Screw the body spacers into the panel with the screws sticking out. Firmly, but not so tight it breaks.
3
TT DC Motor
Turn the panel with the body spacers over so it’s resting on the long screws.
Lay the motor, as shown, with the motor shaft through the hole and the body flat against the panel.
Place the remaing panel ontop of the 4 body spacers.
Align the holes of the spacers with the screws in the top panel and turn the screws in, firmly but don’t tighten too much.
DOUBLE CHECK!
No gaps between the body spacer and the body panel
Body spacers must be flush against the body panel
STARWALKER should look like this.
4
M3 nuts
Fasten M3 nuts to the long body screws. Don’t use the locknuts (the nuts with the blue nylon on the inside).
Fix a nut to all 8 screws and tighten them firmly.
5
A1 – Motor Shaft Hubs (2)
Align a hub’s slotted hole’s long side with the long side of the motor shaft.
Using your thumb apply pressure to the opposite motor shaft while pushing the motor shaft hub in on the other side.
Insert the remaining hub to the motor’s other shaft by applying pressure from both sides.
Make sure they are all the way in, flush against the body panel.
6
A2 – Primary Drive Shaft (2)
Align the hub’s square peg with the square hole in the drive shaft and push it in. Remembering to apply opposing pressure from the other hub.
Do the same with the other drive shaft.
Make sure they are both all the way in.
7
Screws M2 X3mm (2)
Secure both primary drive shafts with a screw. It’s the smallest screw in the kit.
8
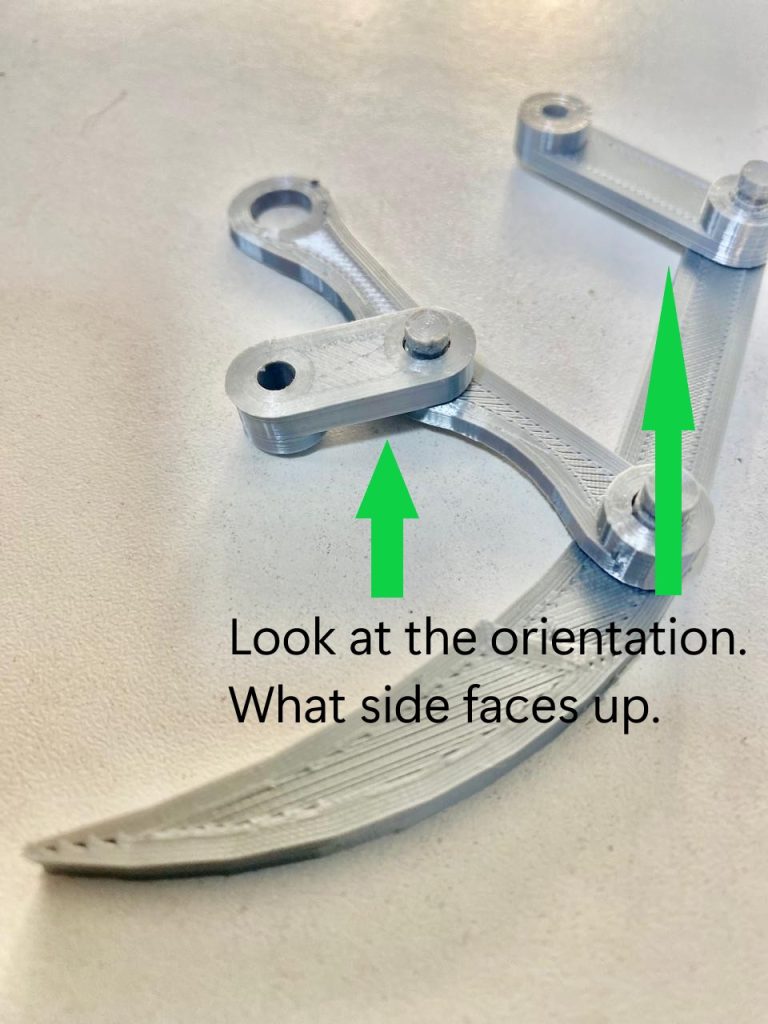
NOTE: B3 has been updated so your B3 may look a little different from these images. Just make sure you get the orientation right (what side faces up). See image below.
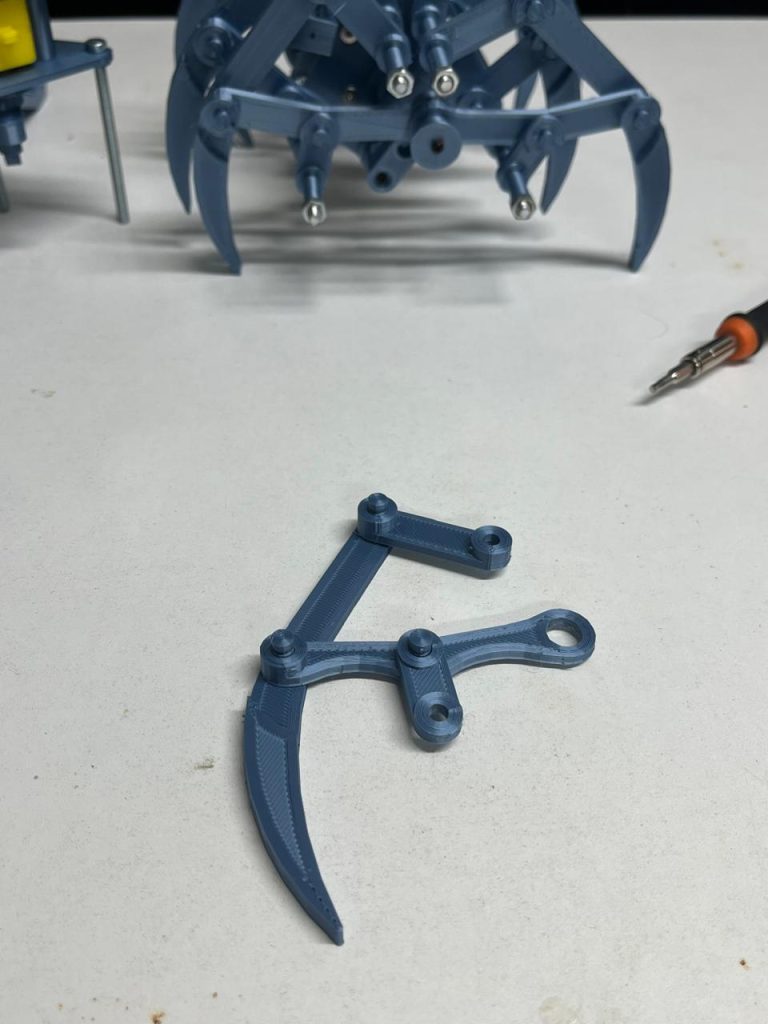
Left Side: B7, B4, B3, B6
Right Side: B7M, B4M, B3, B6
Now we are going to make the legs. Collect all the pieces and make 2 groups, the left and right side, some of the pieces are different (mirrored) so pay close attention.
Lay B7 on a flat surface and insert B6 into the top shaft. Note, B6 has 2 different sized holes, use the bigger one. Study the pictures carefully.
Insert B4 into B7’s remaining shaft.
Finally, push B3 into B4’s shaft.
Finish all four left side legs then do the same for the four right side legs.
IMPORTANT: Be very careful when working with the shafts, push straight down and don’t use too much force. They can break!
DOUBLE CHECK!
Curve must NOT be at the top. If it is you are using the wrong piece.
Curve must be at the bottom.
9
C8
The leg linkages need to be secured. We will use a fastener (C8) to do so.
At the top of each shaft is a groove. Push C8 firmly into the groove until it clicks into place. Take care not to break the shaft by applying opposing support with your fingers.
Each leg needs 3 fasteners (C8) so you will need 24 in total.
10
C1a – Leg Spacers (14mm)
NOTE: There are 2 different sizes. 14mm (the shorter ones) and 16mm. Use the shorter ones here.
We are now going to attach all the legs to one side of STARWALKER first.
Insert C1a into each of the 4 screws as shown, with the flat end facing up.
11
This is the most difficult part of the build.Work gently, don’t force anything. Match what you see in the pictures here to what you have in front of you.
Place one of your left leg sets ontop of the screws on the left side. Align the holes from B3 & B6 to the body screws and push them in at the same time.
Together, push B3 & B6 down the screw until the big hole in B4 is just above A2‘s shaft.
Gently, work A2‘s shaft into B4‘s hole.
Move B3 & B6 a little more down the screw, then move B4 the same distance down A2. Do this until B3 & B6 are flush against the leg spacers (C1a) and B4 flat against A2.
Now take a right side leg set and do the same on the right side.
12
C7 (spacer)
Take C7 and place it over the exposed A2 shaft.
13
A3 (2nd Drive Shaft)
Screws – M2 X3mm (smallest)
Align the square hole in A3 with the square peg of A2 and firmly push it all the way in. Be very careful not to break it. Use a finger of your free hand to support it underneath (as shown in the picture).
Use a screw driver and secure A3 with a small screw (M2X3). While holding the base with your free hand.
14
C1b (16mm – longer ones)
Insert four C1b (spacers) over the protruding body screws. Flat side facing up.
15
Starting on the left side, fix a left leg set to the body screws, as you did with the first leg. Remember to support it underneath with a finger.
Next, fit a right side leg set to the right side.
16
C2 (Stopper)
Screw – M2X3mm
Place a C2 over A3‘s exposed shaft.
Secure in place with a screw (M2X3).
17
C3 (outer body)
Locknuts – M4
Place C3 over the 4 body screws, align the screws with the holes and push it in. Flat side facing up.
Secure in place with a locknut.
18
Now turn STARWALKER over and attach the remaining 4 legs to the other side. Remember to start with the left side or he will have trouble walking. Do everything exactly as you did previously, go back and look at the pictures if you need to.
19
Time for the eye (C5)!
The eye stalk (C5) should be attached to the motor. Clip it onto the top body spacer (C6) as shown. Make sure it is centred. It needs a good push.
20
C4 (battery clip) – Battery
Insert the batteries into the battery case. Ensure you put them in correctly or it won’t work!
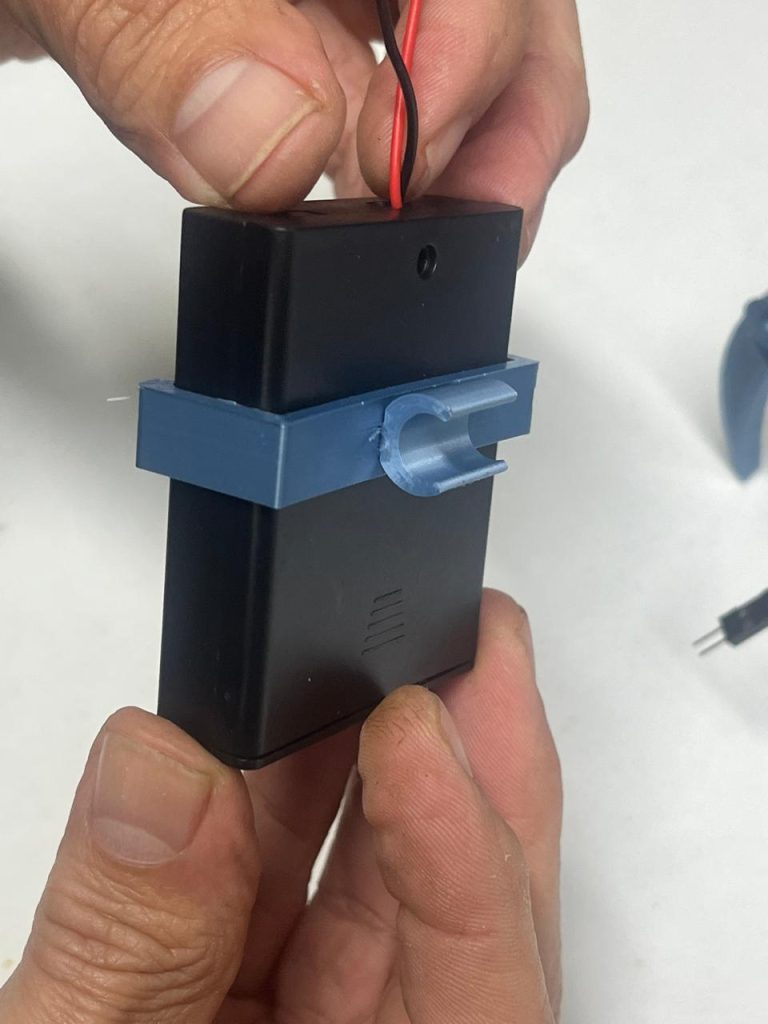
Slide the battery case into C4 (clip). Make sure the switch on the battery case is on the top right and facing you.
Clip C4 and the battery case on to C6 (body spacer). Ensure it is centred and not going to get in the way of moving legs.
The bottom of the batttery case must rest on the ridges, as shown.
21
Check the switch on the battery case is OFF.
Connect the battery wires to STARWALKER. Make sure the red and black wires match.
22
IT’S ALIVE!
Place STARWALKER on a flat surface with enough walking room and turn on the switch.